
티스토리 뷰
안녕하세요. 오늘은 자주 사용하는 협업 메신저 툴인 Slack과 java spring의 연동 방법에 대해서 간략하게 포스팅을 진행해보려고 합니다.
슬랙은 webhook이라는 기능이 지원이 되는데 해당 기능을 사용해, 특정 이벤트 발생 시, 또는 장애 발생 시 그리고, 지라 상태 업데이트 등등 을 슬랙을 통해서 Notification을 받을 수 있습니다.
그럼, 아래의 슬랙 이미지를 확인하고 간단하게 연동 및 테스트를 하는 방법에 대해서 진행해보도록 하겠습니다.

- 링크 : https://slack.com/intl/en-kr/
개발 환경 설정
다음과 같이 메이븐 프로젝트로 진행을 했으며, spring initializer를 통해 pom.xml 파일은 아래와 같이 설정했고, 테스트를 위한 Junit과 자바 객체의 Json 구조 직렬화 역직렬화를 위해 gson 라이브러리를 추가했습니다.
<?xml version="1.0" encoding="UTF-8"?>
<project xmlns="http://maven.apache.org/POM/4.0.0"
  xmlns:xsi="http://www.w3.org/2001/XMLSchema-instance"
  xsi:schemaLocation="http://maven.apache.org/POM/4.0.0 https://maven.apache.org/xsd/maven-4.0.0.xsd">
  <modelVersion>4.0.0</modelVersion>
  <parent>
    <groupId>org.springframework.boot</groupId>
    <artifactId>spring-boot-starter-parent</artifactId>
    <version>2.2.7.RELEASE</version>
    <relativePath/> <!-- lookup parent from repository -->
  </parent>
  <groupId>com.example</groupId>
  <artifactId>demo</artifactId>
  <version>0.0.1-SNAPSHOT</version>
  <name>demo</name>
  <description>Demo project for Spring Boot</description>

  <properties>
    <java.version>1.8</java.version>
  </properties>

  <dependencies>
    <dependency>
      <groupId>org.springframework.boot</groupId>
      <artifactId>spring-boot-starter</artifactId>
    </dependency>
    <dependency>
      <groupId>org.springframework.boot</groupId>
      <artifactId>spring-boot-starter-web</artifactId>
    </dependency>

    <dependency>
      <groupId>org.springframework.boot</groupId>
      <artifactId>spring-boot-starter-test</artifactId>
      <scope>test</scope>
      <exclusions>
        <exclusion>
          <groupId>org.junit.vintage</groupId>
          <artifactId>junit-vintage-engine</artifactId>
        </exclusion>
      </exclusions>
    </dependency>

    <!-- https://mvnrepository.com/artifact/junit/junit -->
    <dependency>
      <groupId>junit</groupId>
      <artifactId>junit</artifactId>
      <scope>test</scope>
    </dependency>

    <!-- https://mvnrepository.com/artifact/com.google.code.gson/gson -->
    <dependency>
      <groupId>com.google.code.gson</groupId>
      <artifactId>gson</artifactId>
      <version>2.8.5</version>
    </dependency>
  </dependencies>

  <build>
    <plugins>
      <plugin>
        <groupId>org.springframework.boot</groupId>
        <artifactId>spring-boot-maven-plugin</artifactId>
      </plugin>
    </plugins>
  </build>

</project>
슬랙 웹훅(webhook) 환경 설정
다음으로는 슬랙에서 webhook으로 notification을 전달받을 수 있는 웹훅 기능을 설정하도록 하겠습니다.
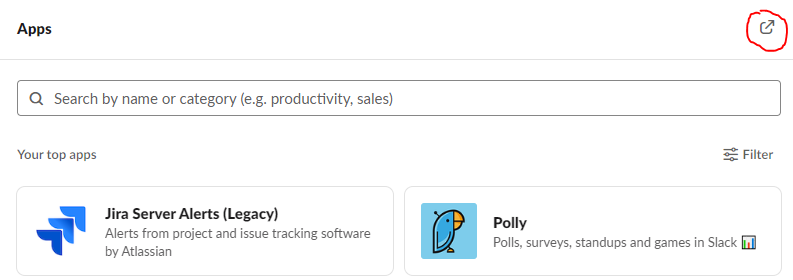
슬랙 채널 창 좌측 하단에 보시면 Apps라는 텍스트가 있는데 해당 텍스트의 오른쪽에 + 버튼 클릭 후, Apps 목록이 나오면 이미지에 표시해둔 버튼을 클릭해줍니다.
브라우저 창이 뜨면, 우측에 Manage를 선택 -> Custom Integrations -> Incoming WebHooks -> Add Slack을 클릭합니다. 그리고 알람을 받을 채널(Channel)을 선택하고 Add Imcoming WebHooks integration을 클릭해 만들어줍니다.

그리고, 위의 내용 중, channel, Webhook URL 등을 카피 해놓습니다.
Application Properties 설정
slack으로 메세지 전송을 위한 기본 데이터를 다음과 같이 application.properties 파일에 작성합니다. (해당 webhook url및 채널은 사용자가 설정한 내용을 기입하면 됩니다)
# External Interface (Slack)
notification.slack.enabled=false
notification.slack.webhook.url=https://hooks.slack.com/services/T02XXXXX/B159XXXXX/W5CDXXXXXXXXpZ1Iv0GZygpT2
notification.slack.channel=#channel
notification.slack.botName=test-bot
notification.slack.icon.emoji=
notification.slack.icon.url=
Java Slack 연동
확장이 가능하도록 NotificationManager라는 클래스를 생성해주면서 아래와 같이 메세지를 만들어 slack으로 전달해주는 메소드도 생성했습니다.
package com.example.demo.notification;

import com.example.demo.notification.sender.SlackSender;
import org.slf4j.Logger;
import org.slf4j.LoggerFactory;
import org.springframework.stereotype.Component;

@Component
public class NotificationManager {

  private Logger logger = LoggerFactory.getLogger(NotificationManager.class);

  private final SlackSender slackSender;

  public NotificationManager(SlackSender slackSender) {
    this.slackSender = slackSender;
  }

  public void sendNotification() {
    logger.info("#### send Notification.");

    // generated Message
    String contents = generatedMessage();

    // send slack
    slackSender.sendSlack(contents);
  }

  /**
   * generated Message.
   *
   * @return
   */
  private String generatedMessage() {
    StringBuilder sb = new StringBuilder();

    sb.append("[Notification]").append(System.getProperty("line.separator"))
      .append("[Name] : ").append("Tester").append(System.getProperty("line.separator"))
      .append("[Message] : ").append("테스트 메시지 !!");

    return sb.toString();
  }
}
또한, 슬랙 메세지 포맷을 만들기 위해 다음과 같이 SlackMessage 클래스들 만들어줬습니다.
package com.example.demo.notification.message;

import com.google.gson.annotations.SerializedName;
import org.springframework.util.StringUtils;

public class SlackMessage {

  @SerializedName("text")
  private String text;

  @SerializedName("channel")
  private String channel;

  @SerializedName("username")
  private String botName;

  @SerializedName("icon_emoji")
  private String iconEmoji;

  @SerializedName("icon_url")
  private String iconUrl;

  public SlackMessage(String text, String channel, String botName, String iconEmoji,
      String iconUrl) {
    this.text = text;
    this.channel = channel;
    this.botName = botName;

    if (!StringUtils.isEmpty(iconEmoji)) {
      this.iconEmoji = iconEmoji;
    }

    if (!StringUtils.isEmpty(iconUrl)) {
      this.iconUrl = iconUrl;
    }
  }

  // Getter & Setter
  public String getText() {
    return text;
  }

  public void setText(String text) {
    this.text = text;
  }

  public String getChannel() {
    return channel;
  }

  public void setChannel(String channel) {
    this.channel = channel;
  }

  public String getBotName() {
    return botName;
  }

  public void setBotName(String botName) {
    this.botName = botName;
  }

  public String getIconEmoji() {
    return iconEmoji;
  }

  public void setIconEmoji(String iconEmoji) {
    this.iconEmoji = iconEmoji;
  }

  public String getIconUrl() {
    return iconUrl;
  }

  public void setIconUrl(String iconUrl) {
    this.iconUrl = iconUrl;
  }
}
그리고 아래와 같이 SlackSender를 만들어서 최종적으로 슬랙에 webhook 전송을 진행하는 코드를 작성해줍니다.
package com.example.demo.notification.sender;

import com.example.demo.notification.message.SlackMessage;
import com.google.gson.Gson;
import org.slf4j.Logger;
import org.slf4j.LoggerFactory;
import org.springframework.beans.factory.annotation.Value;
import org.springframework.http.HttpEntity;
import org.springframework.http.HttpHeaders;
import org.springframework.http.MediaType;
import org.springframework.stereotype.Service;
import org.springframework.web.client.RestTemplate;

@Service
public class SlackSender {

  private Logger logger = LoggerFactory.getLogger(SlackSender.class);

  @Value("${notification.slack.enabled}")
  private boolean slackEnabled;

  @Value("${notification.slack.webhook.url}")
  private String webhookUrl;

  @Value("${notification.slack.channel}")
  private String channel;

  @Value("${notification.slack.botName}")
  private String botName;

  @Value("${notification.slack.icon.emoji}")
  private String iconEmoji;

  @Value("${notification.slack.icon.url}")
  private String iconUrl;

  public void sendSlack(String contents) {
    if (slackEnabled) {
      try {
      	// create slack Message
        SlackMessage slackMessage = new SlackMessage(contents, channel, botName, iconEmoji, iconUrl);
        String payload = new Gson().toJson(slackMessage);

        RestTemplate restTemplate = new RestTemplate();
        HttpHeaders headers = new HttpHeaders();
        headers.set("Content-Type", MediaType.APPLICATION_JSON_VALUE);

        // send the post request
        HttpEntity<String> entity = new HttpEntity<>(payload, headers);
        restTemplate.postForEntity(webhookUrl, entity, String.class);

      } catch (Exception e) {
        logger.error("Unhandled Exception occurred while send slack. [Reason] : ", e);
      }
    }
  }
}
테스트
다음으로 위에서 작성된 코드가 정상적으로 동작하는지 테스트를 위해서 Junit 테스트코드를 아래와 같이 작성 후, 실행합니다.
package com.example.demo.notification;

import org.junit.Test;
import org.junit.runner.RunWith;
import org.springframework.beans.factory.annotation.Autowired;
import org.springframework.boot.test.context.SpringBootTest;
import org.springframework.test.context.junit4.SpringRunner;

@RunWith(SpringRunner.class)
@SpringBootTest
public class NotificationManagerTest {

  @Autowired
  private NotificationManager notificationManager;

  @Test
  public void NotificationTest() {
    // test slack notification
    notificationManager.sendNotification();
  }
}
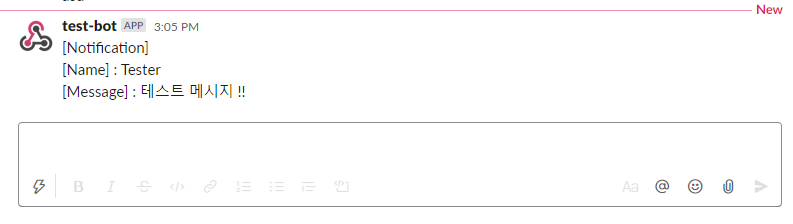
테스트가 정상적으로 작동하게 되면 설정했던 채널에 아래와 같이 테스트 메세지가 정상적으로 전달되는 것을 확인할 수 있습니다.
이상으로 spring java & slack 연동에 대한 작업은 마무리가 되었으며, 포스팅을 마치도록 하겠습니다.
- Total
- Today
- Yesterday